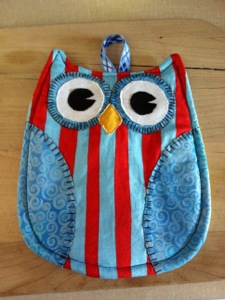
Bunting!

No Comments »

Friends of mine were married in the Caribbean in January on an amazing cruise (talk about a great time!) and since not everyone could join us, they decided to have a wedding reception up at the bride’s mom’s place just outside of town. It’s a beautiful spot right on the lake (where/why we built the picnic table) which will be a great setting.

The bride decided that she wanted to make bunting for the party, so we started to plan the most cost-effective way to complete the project. We headed off to Fabricland (FABRICLAND!) with my membership card in hand and came away with these gems:

20120720-105119.jpg

She decided on two different fabrics (in the same colour scheme) for each flag, along with some stripey fabric to make bias tape. You can buy pre-made bias tape, but a) it’s expensive (we needed 75 m, and at least $1+ a m it wasn’t worth it) and b) it’s usually pretty ugly.

A bunch of us got together the other night and started our assembly line.

Two of us measured and cut the fabric into rectangles

20120720-105440.jpg

Pretty fabric

20120720-105851.jpg

Then handed them off to the second group, who made the flags by measuring them and cutting with a rotary pinking blade

20120720-105606.jpg

20120720-110646.jpg

When we were done cutting the fabric, we moved onto cutting the bias tape. We measured out 2″ and started cutting with a straight rotary blade which made things much easier

Once all the strips were cut, one of us ironed them in half

20120720-105735.jpg

Then I sewed them all together

20120720-105824.jpg

When that was done, they were ironed inwards so that both edges met the middle

20120720-110026.jpg

Then they were ironed in half so that the tape folded against itself, making a running pocket along the tape

20120720-110143.jpg

We made a lot of bias tape

20120720-110208.jpg

When that was done, it was finally time to sew some flags in!

20120720-110242.jpg

In the end we made 15 feet before I went home. Bride and groom made more once I left.

I think it turned out fantastic, and I can’t wait to see all of them up an in their glory

20120720-110448.jpg

This was a relatively large and involved project, and we couldn’t have done it without the help of some amazing women. There were seven of us working on this at one time! So thanks to everyone (including groom!) for pulling together and making such a great project a success!

Posted on July 20th 2012 in Sewing

Dog jacket to be proud of!

No Comments »

Once I hacked away at the first jacket, I felt empowered to attempt a second, more detail oriented one that would make my sewing teacher proud.

I saw a short tute from Instructables.com for a doggie cooling jacket made from cargo pants. I didn’t care much for the cooling/waterproof/insulated part, but dug the idea of using existing pockets vs. making some.

I didn’t take a lot of photos because I didn’t think it would turn out. Lol. Surprise!

1. Find an old pair of cargo pants and cut out the inner seam. I hunted at Value Village until I found ones that had a big pocket. They were $6.77 with tax (wtf? Value Village charges tax on donated items?)
20120623-184052.jpg

2. Cut out the basic shapes, as well as the cargo pockets. Initially I cut them too wide, so I ended up trimming them to just under the pocket seam
20120623-184146.jpg

3. Iron down the hem and see at 3/8″. Or whatever you’re comfortable with, I ain’t picky
20120623-184232.jpg

4. Add the belly and groin straps. I added buttonholes and buttons since Velcro tends to get full of dog hair and other junk. I had to hand sew the ends, but didn’t leave myself enough room, so they were a pain

20120623-184510.jpg

5. Add the cargo pockets. I sewed them along the existing stitches, which made an easy guide

20120623-184732.jpg

Et voilĂ ! Ready to fill with ice packs, weights or their own poop bags!

20120623-184809.jpg

Posted on June 23rd 2012 in Dogs, Sewing