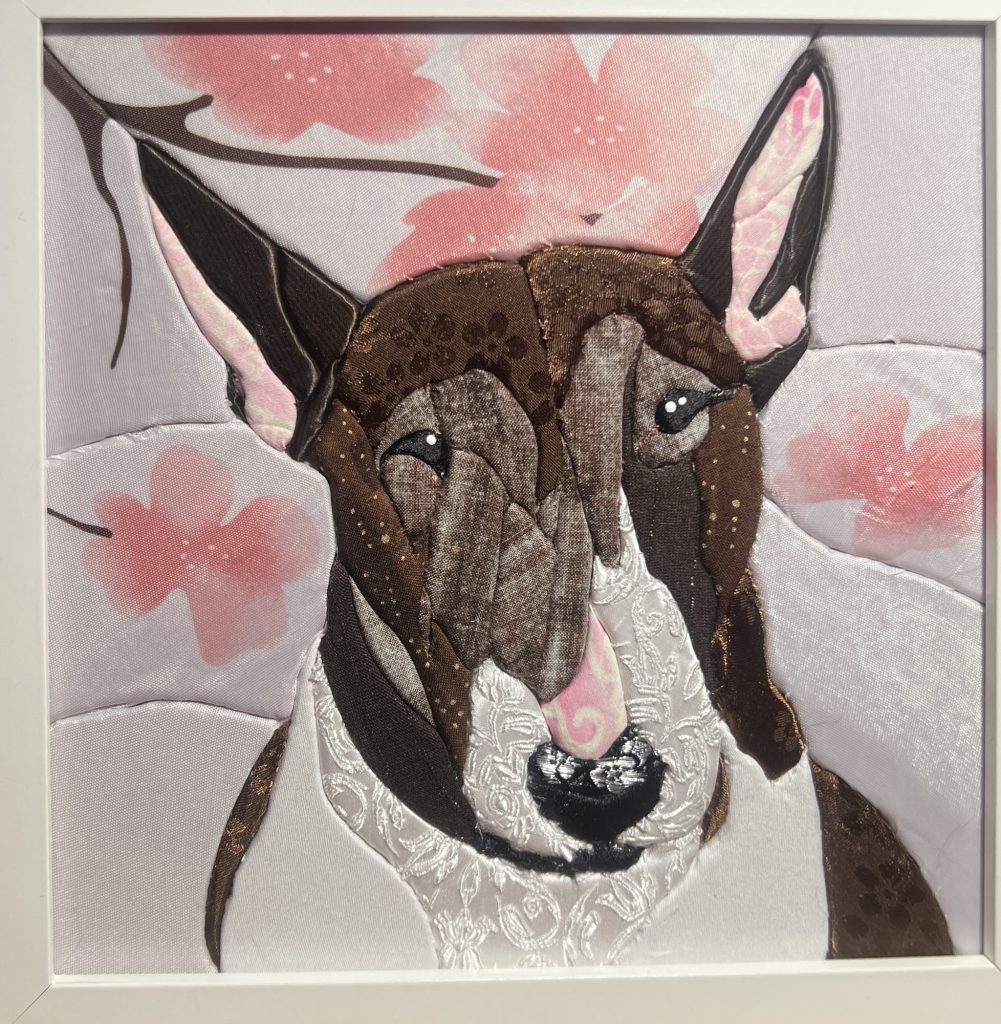
This is Marley, my mom’s dog. It’s probably the best picture I’ve ever taken of her, and I’ve technically already used it once in a painting, but a good reference is a good reference. Don’t mind her spit bubble.
As usual, I made a stencil by using my mom’s bf’s iPad (I seriously considered shelling out over 1k for my own of that size before I realized I’d probably really be only using it for this, because my iPad Air 2 still works fine for what I need it for thankyouverymuch and like, over 1K?? Plus over $100 for a pen? When I can just his use? Criminal), and then cut out each section. You have to be a bit generous with the shapes because it’s impossible to get this absolutely perfect as it’s by far from a realism portrait. Letting loose with art is a new concept for me lol.
I already had most of the fabric on hand, but went out to specifically get the black fabric with flowers, because I wanted it to be a bit different from the rest of her mottled colour. Part of the good thing about buying new fabric for this kind of craft is that there was a sale and it was half off and I paid less than $3 Canadian for a good swatch of more than what I needed for this. On the flip side, a whole bedsheet or comforter cover or shower curtain or whatever is like, $8 at Value Village. Cheaper, way more material, but way less selection. Anyway.
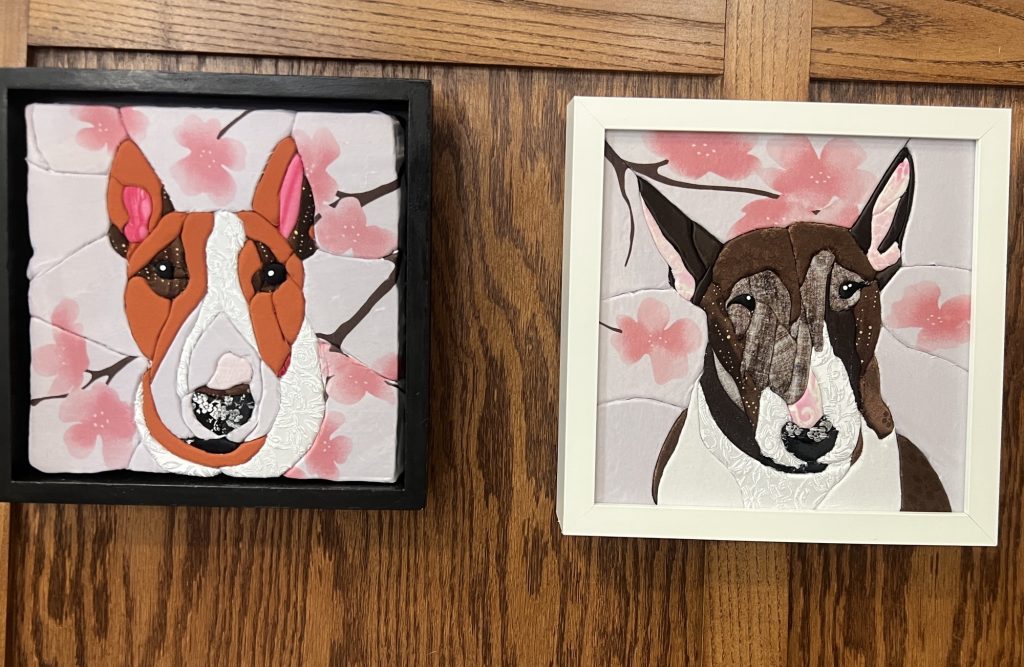
And here’s the finished piece! The background was from a sheet set my mom was gifted while visiting her family in Italy, but it didn’t end up fitting her bed. I don’t love how it turned out, but I wanted to incorporate it somehow so she at least still had a piece of it left. The frame is thrifted from the Habitat for Humanity Re-Store. You want to look for frames that are in-set from the front. Meaning, there’s no glass in front of the artwork, and the depth is at least 1″, or the depth of your piece.
It looks complicated, but it actually goes really quickly once you start putting pieces in. I started tracing on Friday, and finished the piece on Sunday, and probably could have had it done Saturday had I not booked myself a bunch of other things to do on the same day. lol.
I learned a lot from my Lala piece, and I thought I’d tackle doing a portrait of the OG bull terrier, Missy. She belonged to a friend of mine, and is what made me fall in love with the breed, eventually leading to adopting my own bull terrier, Tug.
The lady who posted the original IG reel I saw had created a tut on how to make a stencil and handle the eyes, which I struggled with on my Lala piece. Would have been nice had I seen that BEFORE I started the Lala one, but timing be what she be.
I cut the foam and sticky tape to size, but I need to find a better foam cutting method (without using a hot wire) because I can’t seem to get my edges straight (hah!) or smooth.
I started off using my mom’s BF’s iPad to trace the stencil. Using Guided Access, you can turn off touches to the screen to prevent the image from moving around. Frustratingly, I managed to trigger some magnifying loupe thing, and then couldn’t restart the iPad, but that’s neither here nor there, just something to think of if you want to use Guided Access.
Using a free iOS program similar to Procreate, I made loose shapes and didn’t overly worry about the details. Missy had a lot of interesting features, including her tiny little ears, and I wanted to make sure I captured the difference in colour and fur texture.
Then I traced those shapes onto a sheet of stencil paper. I taped it to the foam, and using a scalpel, cut out the shapes, leaving the sheet of paper over the sticky part.
Then I went through the fabric I bought at VV (and washed in hot water, natch) as well as what I had on hand. Technically, her colour is what’s called smut, and finding a big huge chunk of fabric in that exact colour is hard, but I went with this bed sheet. I already had the pink, black, brown, curly white, and red fabric on hand. I wish I’d used more artistic licence to extend the red fabric (her collar) so the pattern was more visible. It’s Chinese brocade silk with dragons on it. I failed to realize that the sliver of red would be even smaller once I was done tucking. I could have extended that up farther and thicker, but anyway.
Then, section by section, I took off the paper, exposing the sticky side, and cut pieces of fabric around the paper side. With a stitch ripper, I tucked each bit of fabric in around where I had cut the line. Once you start tucking, you can trim the excess with scissors or a nipper.
I wanted to capture the different textures, and colours. In the picture, her fur is wet, ostensibly because she was just in that stinky lake (she was like that), so I used the curly white fabric to show fur texture, and break up the whites. Making a lot more individual slices was WAY better than just doing one flat face like I did for La.
As I was looking for fabric at VV, I came across this cherry blossom shower curtain. I didn’t even bother looking at it, I just grabbed it right away. I knew I wanted it for the background, but I was slightly concerned that the blossoms were too big. They weren’t.
Learning from the Lala piece, I cut the edge pieces about an inch longer than necessary. Then I went along and extended the cut to the edges, and tucked the fabric in. I tried to overlap it so that if there was one shorter side, it got tucked in by the longer side, if that makes sense. Then I used some of the off cuts of sticky paper to adhere it to the back, and used painter’s tape to stick it all down. On the back, I used the rest of the sticky tape so I can mount it to the frame.
There are some weird tucks and folds in the fabric, but it IS a fabric craft, so I think that’s allowedsies. Also, the shower curtain was so delicate and would run if you looked at it sideways, but I think it worked pretty well in the end. In order to have a continued blossom or tree branch across a seam, I had to find two that were similar (which was impossible since the pattern was non-repeating), and then position them in such a way to look like they’re one. I had originally bought pink satin fabric for her nose, but I ended up pulling it off (and also the sticky, so I had to re-cut that piece) because it was too similar to the white from the shower curtain above her nose. This was a piece of leftover pink and red polka dot fabric that I had on hand, but if I were to do this again, I would probably try using the blossom from the shower curtain. I used the white from the shower curtain for the bridge of her nose because it was a bit see-through, and her that part of her nose isn’t entirely white white.
You can see that the block is a little wonky, but like, whatever. I can’t do anything straight, and everyone knows it. At this point, she was still missing white paint dots for reflections in her eyes, but it’s essentially done.
I had bought some frames at VV, but realized they were the wrong kind of frames and would require too much work to retrofit into what I wanted. Instead, I found three of these ones where the image is set at the back of the frame. You want it set in as deep as your foam so the piece is flush with the front of the frame. My foam was 1″ deep. This frame was in pretty rough shape, so I washed it down and sanded it with a magic eraser to get some of the grime off. Then I painted the back and sides black. I will probably leave the background as-is, because the piece should cover it. You can’t tell from the picture, but it’s sorta glossy and I don’t really want to fuck with covering that properly. I also coated it in glossy Mod Podge, because the black acrylic is just going to be flaky and I don’t want it to scratch or come off. On that note – anyone have tips for a streak-free finish? I tried watering it down a little, and did thin coats, and even tried using my finger, but it’s still rougher than I’d like. Anyway.
And here’s the finished piece! I’m pretty happy with how it turned out, all things considering. I still think her nose isn’t pink enough, but I don’t want to undo it a second time. I am often guilty of picking at a project after it’s done, then wrecking it as a result. I think the background is more dynamic than my first one, and I think more sections = better result. You can REALLY tell that the cut isn’t even/smooth, so I am looking into a heated foam-cutting tool so I can fix it on my next one. In any event, I hope my friend likes it!